
Easy 🙂
A few days back I was playing with Photoshop creating crumpled paper with torn edges and today it’s Illustrator time!
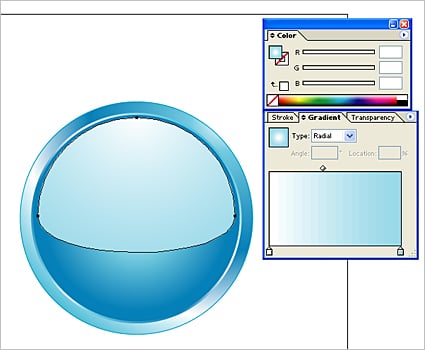
First, draw a circle (using Shift tab) and fill it with radial gradient like this:

Now, copy that circle, paste it on the top of the first one and make it smaller. Rotate the gradient fill in that smaller circle for 180 degree. This will create a “shining” effect.

Make another circle resize it to make it smaller than the one we did just now. Fill it in using simple radial gradient fill.

Now make the fourth (this is the last one) circle that’s smaller than third one and use Pen tool to create a shape that will look like this: (select the bottom anchor point and simply delete it).
Done. Now, that wasn’t difficult, was it?

Have fun creating!
Silvia


I love this simplicity 😉
Keep up the good work bro 😉
Thanks, I will 🙂
S*
I managed to do this pretty well, but I just have one question. How do you make a radial gradient offset from the center?
I guess you ment off the center? 🙂 Using “Gradient Tool” just drag a straight line starting outside the circle and ending on the other side of circle.
Hope that helps.
S*
If you meant “from the center” after drawing it “off the center” just reset Gradient Tool from Radial to Linear and then again to Radial…
S*
Rick!
It’s beautiful what you’ve done there. Is it ok with you if I write a post about it and use that image in it?
Thanks a lot for nice tut..
keep it up
Vishal patil India
it is very beautiful …. thank you very much but i can not make the same gradient so the result is not good
Very nice. I love it.
This is very good i found this page by google. thanks for sharing the tips >_<
Gorgeous, thanks so much for sharing!
Excellent tutorial! This was exactly what I was looking for and easy to accomplish. Thank you for sharing!
Thanks John John!
S
Great tutorial, thanks so much for sharing this, stumbled it too 🙂
Marvelous!
[…] 1. Tutorial: How to create a shiny Web 2.0 button in Illustrator (graphics-illustrations) […]
Love it, but I am still stuck on making a gradation like that! It looks like the center of the radial gradation is off center. Love it if anyone can help me out here!