Gang,
It’s been a while since I made a Photoshop tutorial. Now, here it is. A “dreamy portrait” and how to make it. Fast, simple and easy.
This is the original photo of my friend Suzana. She was using her mobile when this picture was taken and I wanted to create more “dreamy” look. So I sat down by my Photoshop and created another image of Suzana.
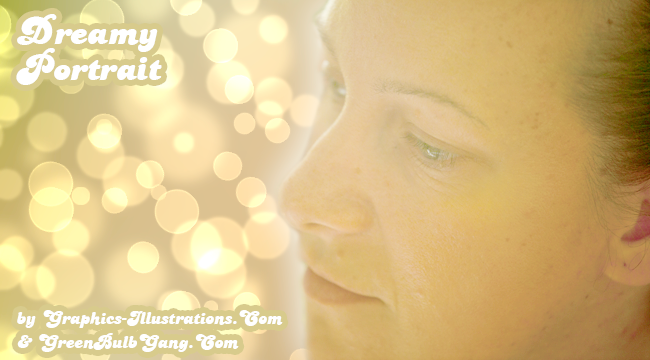
This our final image:

And here is what we begun with:

So after importing an image into the Photoshop go to:
1. Layer->New Adjustment Layer->Levels

2. Select Level Presets

3. Select Lighten Shadows

4. Play with the histogram until you get the desired look

5. Now, add new white colored layer above the image. Copy the layer containing the photo and place it above the white colored layer you just created.
6. Add a layer mask to the layer containing the photo by clicking the layer mask icon.
7. Use the brush tool (F5) ![]() to “erase” the parts you don’t want to have on the image.
to “erase” the parts you don’t want to have on the image.
8. You can adjust the brush size, opacity and flow to make the “cleaning” easier and faster. Make sure that the “foreground color” is black. You can clear the background on this stage like I did.

9. Now, select “Outer glow” option from the layer effects (double click on Layer)

10. Select the color which is the closest to the background photo color…

11. Now, at this stage I wanted to expand the canvas of the image and get more space on the left side.
Select Image->Canvas Size and expand the width of the photo to the left.

12. Now select the lower layer…

13. … and stretch it to the left.

14. From the Filter menu select Filter->Blur->Gaussian Blur in order to blur this stretched layer.

15. Create a new Layer group above the blurred background

16. Load the Bokeh Photoshop brushes (they are a part of Sweet Love Valentine’s Pack), enlarge the spacing and re-size the brush (this may vary according to the image size) and enlarge brush spacing

17. Change the Shape dynamics (this may vary according to the image size)

18. Change the Scattering option (this may vary according to the image size)

19. Move the brush over the image, it will randomly add bokeh circles

20. From the Filter menu choose Filter->Blur->Gaussian Blur in order to blur the circles

21. Create new layer above the current layer

22. Use the same brush, but this time will work with smaller size

23. Again, from the Filter menu choose Filter->Blur->Gaussian Blur in order to blur the image, but less than the layer below

24. Again, add another layer (3rd one)

25. Now add more, even smaller bokeh brushes

26. Leave the 3rd layer as it is.

27. Now select the Layer group which contains those three layers with bokeh brushes

28. And change the layer mode to the “Color Dodge”

29. And voila! Here is our Dreamy Portrait Image
I hope you liked this tutorial and
while I’m creating new brushes, vectors, wallpapers or tutorials, feel free to visit FiveCatsGraphics Shop on Etsy for some totally cool Clip Art, Photo Overlays and loads of other designers tools, or take a look at Premium content here at graphics-illustrations.com!
Have fun creating!
Silvia