OK Gang!
First, I need to apologize for not writing for so long.
Mea culpa. Was away for a while.
So, for those of you who wanted to find out was the graphic from the previous post done – here it is.
OK. But, first, let me show you another version of the same graphic (one layer is switched off and it became even more interesting – I think).

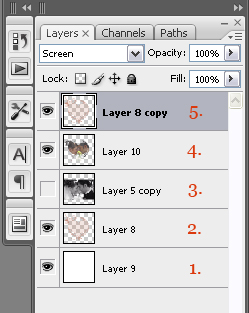
OK. And here is what it looks like in Photoshop:

So, let’s go layer by layer starting from the bottom.
- White background (it’s kinda obvious but I need to be consistent 🙂
- Layer with the brush, filled and outlined, stroke, 3px. You can choose colors as you feel fit. The same one is copied and placed on the top – point No. 5
- Black&White version of the photo
- Color version of the photo, cut-out in the shape of the brush. How it’s done? Easy a) select the layer with the full image b) Hold down the Ctrl key and click on the layer with the brush, brush shaped selection will load it self onto photo c) Press Ctrl+Shift+I to invert the selectio d) Press Delete to delete the selectio. That’s how I got this layer
- Copy of layer 8, Layer blending mode – Screen (for all other Layers it’s Normal)
And that’s it!
Let me know if point 4 was not explained very well. I will make a video about it.
Don’t forget! This great brush is a part of even greater package called Wedding PS Brushes Pack (304), 304 HiRes Commercial free PC/Mac Photoshop brushes
Love,
Silvia


Do your brush sets work with photoshop elements 6
Hi Teresa,
Yes they do!
Cheers,
S.
thankyou verrry much
i learnt something
i hope to see more of ur tutorials
thx